hi
08946374405366963398noreply
here it is, social website traffic:
http://www.mgdots.co/detail.php?id=113
Full details attached
Regards
Dusti Baskett �
Unsubscribe option is available on the footer of our website
lunes, 29 de junio de 2020
re: Cheap Facebook Traffic
sábado, 13 de junio de 2020
re: How to remove a site from top 10 for important keywords
Negative SEO with Satisfaction Guaranteed
http://www.blackhat.to
viernes, 12 de junio de 2020
BurpSuite Introduction & Installation
What is BurpSuite?
Burp Suite is a Java based Web Penetration Testing framework. It has become an industry standard suite of tools used by information security professionals. Burp Suite helps you identify vulnerabilities and verify attack vectors that are affecting web applications. Because of its popularity and breadth as well as depth of features, we have created this useful page as a collection of Burp Suite knowledge and information.
In its simplest form, Burp Suite can be classified as an Interception Proxy. While browsing their target application, a penetration tester can configure their internet browser to route traffic through the Burp Suite proxy server. Burp Suite then acts as a (sort of) Man In The Middle by capturing and analyzing each request to and from the target web application so that they can be analyzed.

Everyone has their favorite security tools, but when it comes to mobile and web applications I've always found myself looking BurpSuite . It always seems to have everything I need and for folks just getting started with web application testing it can be a challenge putting all of the pieces together. I'm just going to go through the installation to paint a good picture of how to get it up quickly.
BurpSuite is freely available with everything you need to get started and when you're ready to cut the leash, the professional version has some handy tools that can make the whole process a little bit easier. I'll also go through how to install FoxyProxy which makes it much easier to change your proxy setup, but we'll get into that a little later.
Requirements and assumptions:
Mozilla Firefox 3.1 or Later Knowledge of Firefox Add-ons and installation The Java Runtime Environment installed
Download BurpSuite from http://portswigger.net/burp/download.htmland make a note of where you save it.
on for Firefox from https://addons.mozilla.org/en-US/firefox/addon/foxyproxy-standard/
If this is your first time running the JAR file, it may take a minute or two to load, so be patient and wait.
Video for setup and installation.
You need to install compatible version of java , So that you can run BurpSuite.
Read more
How To Download Torrents Files Directly To Your Android Device

Procedure:
- Download and install uTorrent on your smartphone or tablet
- At the end of the installation click Open.
- Look for the torrents of your choice, several free and legal resources are available:
- http://www.legittorrents.info/
- http://www.publicdomaintorrents.info/
- http://www.legaltorrents.com/
- In the list of results, click on the magnet shaped button that appears below the file you want to download
- A window showing where the file will be saved in the memory card will open. Click on Add

- Utorrent will start downloading the file
- Once the download is complete press the Play button to open the file


Other softwares
More information
jueves, 11 de junio de 2020
CEH: System Hacking, Cracking A Password, Understanding The LAN Manager Hash, NetBIOS DoS Attacks

Passwords are the key element of information require to access the system. Similarly, the first step is to access the system is that you should know how to crack the password of the target system. There is a fact that users selects passwords that are easy to guess. Once a password is guessed or cracked, it can be the launching point for escalating privileges, executing applications, hiding files, and covering tracks. If guessing a password fails, then passwords may be cracked manually or with automated tools such as a dictionary or brute-force method.
Cracking a Password
Passwords are stored in the Security Accounts Manager (SAM) file on a Windows system and in a password shadow file on a Linux system.
Manual password cracking involves attempting to log on with different passwords. The hacker follows these steps:
- Find a valid user account (such as Administrator or Guest).
- Create a list of possible passwords.
- Rank the passwords from high to low probability.
- Key in each password.
- Try again until a successful password is found.
A more efficient way of cracking a password is to gain access to the password file on a system. Most systems hash (one-way encrypt) a password for storage on a system. During the logon process, the password entered by the user is hashed using the same algorithm and then compared to the hashed passwords stored in the file. A hacker can attempt to gain access to the hashing algorithm stored on the server instead of trying to guess or otherwise identify the password. If the hacker is successful, they can decrypt the passwords stored on the server.
Understanding the LAN Manager Hash
Windows 2000 uses NT LAN Manager (NTLM) hashing to secure passwords in transit on the network. Depending on the password, NTLM hashing can be weak and easy to break. For example, let's say that the password is 123456abcdef . When this password is encrypted with the NTLM algorithm, it's first converted to all uppercase: 123456ABCDEF . The password is padded with null (blank) characters to make it 14 characters long: 123456ABCDEF__ . Before the password is encrypted, the 14-character string is split in half: 123456A andBCDEF__ . Each string is individually encrypted, and the results are concatenated:
123456A = 6BF11E04AFAB197F
BCDEF__ = F1E9FFDCC75575B15
The hash is 6BF11E04AFAB197FF1E9FFDCC75575B15 .
Cracking Windows 2000 Passwords
The SAM file in Windows contains the usernames and hashed passwords. It's located in the Windows\system32\config directory. The file is locked when the operating system is running so that a hacker can't attempt to copy the file while the machine is booted to Windows.One option for copying the SAM file is to boot to an alternate operating system such as DOS or Linux with a boot CD. Alternately, the file can be copied from the repair directory. If a system administrator uses the RDISK feature of Windows to back up the system, then a compressed copy of the SAM file called SAM._ is created in C:\windows\repair . To expand this file, use the following command at the command prompt:
C:\>expand sam._ sam
After the file is uncompressed, a dictionary, hybrid, or brute-force attack can be run against the SAM file using a tool like L0phtCrack. A similar tool to L0phtcrack is Ophcrack.
Download and install ophcrack from http://ophcrack.sourceforge.net/
Redirecting the SMB Logon to the Attacker
Another way to discover passwords on a network is to redirect the Server Message Block (SMB) logon to an attacker's computer so that the passwords are sent to the hacker. In order to do this, the hacker must sniff the NTLM responses from the authentication server and trick the victim into attempting Windows authentication with the attacker's computer.A common technique is to send the victim an email message with an embedded link to a fraudulent SMB server. When the link is clicked, the user unwittingly sends their credentials over the network.
SMBRelay
An SMB server that captures usernames and password hashes from incomingSMB traffic. SMBRelay can also perform man-in-the-middle (MITM) attacks.
SMBRelay2
Similar to SMBRelay but uses NetBIOS names instead of IP addresses to capture usernames and passwords.pwdump2
A program that extracts the password hashes from a SAM file on a Windows system. The extracted password hashes can then be run through L0phtCrack to break the passwords.Samdump
Another program that extracts NTLM hashed passwords from a SAM file.C2MYAZZ
A spyware program that makes Windows clients send their passwords as clear text. It displays usernames and their passwords as users attach to server resources.NetBIOS DoS Attacks
A NetBIOS denial-of-service (DoS) attack sends a NetBIOS Name Release message to the NetBIOS Name Service on a target Windows systems and forces the system to place its name in conflict so that the name can no longer be used. This essentially blocks the client from participating in the NetBIOS network and creates a network DoS for that system.- Start with a memorable phrase, such as "Maryhadalittlelamb"
- Change every other character to uppercase, resulting in "MaRyHaDaLiTtLeLaMb"
- Change a to @ and i to 1 to yield "M@RyH@D@L1TtLeL@Mb"
- Drop every other pair to result in a secure repeatable password or "M@H@L1LeMb"
Now you have a password that meets all the requirements, yet can be "remade" if necessary. Related posts
re: re: improve serps
Hi again
here is the service I was telling you about
https://www.monkeydigital.tk/product/serp-booster/
thanks and regards
Dong Passmore
Thu, 11 Jun 2020 06:02:07 -0700 tr, 19:37 montearroyo.publicaciones
<montearroyo.publicaciones@blogger.com> raše:
Ok, send m$e the li&nk, I need the ranks to be fixed urgantly.
RECONNAISSANCE IN ETHICAL HACKING
What is reconnaissance in ethical hacking?
This is the primary phase of hacking where the hacker tries to collect as much information as possible about the target.It includes identifying the target ip address range,network,domain,mail server records etc.
They are of two types-
Active Reconnaissance
Passive Reconnaissance
1-Active Reconnaissance-It the process from which we directly interact with the computer system to gain information. This information can be relevant and accurate but there is a risk of getting detected if you are planning active reconnaissance without permission.if you are detected then the administration will take the severe action action against you it may be jail!
Passive Reconnaissance-In this process you will not be directly connected to a computer system.This process is used to gather essential information without ever interacting with the target system.

Read more
miércoles, 10 de junio de 2020
Secret Hack Codes For Android Mobile Phones
Secrete Hack codes for Android Mobile phones
Secret hack codes are usually hidden from users to prevent misuse and exploit. Android is a very new platform so there aren't many hack codes for Androids available. Today I will share all of the hack codes of Android cellphones that I know. I have tested these codes on my Samsung Galaxy with the Android OS version 2.2. I am sure these will work on all previous versions.

Secret Hack Codes for Android Mobile Phones:
1. Complete Information About Your Phone
*#*#4636#*#*
This code can be used to get some interesting information about your phone and battery. It shows the following 4 menus on the screen:
- Phone information
- Battery information (How to maximize or boost battery life in android phones)
- Battery history
- Usage statistics
2. Factory data reset
*#*#7780#*#*
This code can be used for a factory data reset. It'll remove the following things:
- Google account settings stored in your phone
- System and application data and settings
- Downloaded applications
It will NOT remove:
- Current system software and bundled application
- SD card files e.g. photos, music files, etc.
Note: Once you give this code, you will get a prompt screen asking you to click on the "Reset phone" button, giving you the chance to cancel your operation.
3. Format Android Phone
*2767*3855#
Think before you input this code. This code is used for factory formatting. It will remove all files and settings, including the internal memory storage. It will also reinstall the phone firmware.
Note: Once you give this code, there is no way to cancel the operation unless you remove the battery from the phone.
4. Phone Camera Update
*#*#34971539#*#*
This code is used to get information about phone camera. It shows following 4 menus:
- Update camera firmware in image (Don't try this option)
- Update camera firmware in SD card
- Get camera firmware version
- Get firmware update count
WARNING: NEVER use the first option. Your phone camera will stop working and you will need to take your phone to a service center to reinstall camera firmware.
5. End Call/Power
*#*#7594#*#*
This one is my favorite. This code can be used to change the action of the "End Call/Power" button. Be default, if you hold the button down for a long time, it shows a screen asking you to select between silent mode, airplane mode, and power off.
Using this code, you can enable this button to power off without having to select an option, saving you some time.
6. File Copy for Creating Backup
*#*#273283*255*663282*#*#*
This code opens a file copy screen where you can backup your media files e.g. images, sound, video and voice memo.
7. Service Mode
*#*#197328640#*#*
This code can be used to enter into service mode. In service mode, you can run various tests and change settings.
8. WLAN, GPS and Bluetooth Secret Hack Codes for Android:
*#*#232339#*#* OR *#*#526#*#* OR *#*#528#*#* – WLAN test (Use "Menu" button to start various tests)
*#*#232338#*#* – Shows WiFi MAC address
*#*#1472365#*#* – GPS test
*#*#1575#*#* – Another GPS test
*#*#232331#*#* – Bluetooth test
*#*#232337#*# – Shows Bluetooth device address
9. Codes to get Firmware version information:
*#*#4986*2650468#*#* – PDA, Phone, H/W, RFCallDate
*#*#1234#*#* – PDA and Phone
*#*#1111#*#* – FTA SW Version
*#*#2222#*#* – FTA HW Version
*#*#44336#*#* – PDA, Phone, CSC, Build Time, Changelist number
10. Codes to launch various Factory Tests:
*#*#0283#*#* – Packet Loopback
*#*#0*#*#* – LCD test
*#*#0673#*#* OR *#*#0289#*#* – Melody test
*#*#0842#*#* – Device test (Vibration test and BackLight test)
*#*#2663#*#* – Touch screen version
*#*#2664#*#* – Touch screen test
*#*#0588#*#* – Proximity sensor test
*#*#3264#*#* – RAM version
@EVERYTHING NT
Continue reading
re: Additional Details
hi there
After checking your website SEO metrics and ranks, we determined
that you can get a real boost in ranks and visibility by using
aour Deluxe Plan:
https://www.hilkom-digital.com/product/deluxe-seo-plan/
thank you
Mike
How To Recover Files That Are Deleted From Recycle Bin
How To Recover Files That Are Deleted From Recycle Bin
How To Recover Files That Are Deleted From Recycle Bin
Well, Windows users have a bad habit of removing files from recycle bin. Deleting useless files from Recycle Bin helps a user to save some storage space which can improve the speed of a computer. However, Windows users do that more frequently and later regret. Actually, Recycle Bin is a place from where we can get back our deleted files and folders.
Sometimes, we accidentally delete our important files and folders and due to some reason we lose them from Recycle bin too! At that time, we search for recovery methods. Well, there are many methods available over the web which can help you to recover deleted files from computer, but, when it comes to reliability, nothing can beat EaseUS.
What Is EaseUS Data Recovery Wizard?

EaseUS is one of the leading software providers which is known for its data recovery programme. EaseUS offers some free data recovery software that can help you to recover deleted, formatted or lost data from PC, laptop or removable device easily and quickly.
One of the best thing about EaseUS is that it provides tools for recycle bin recovery which can help you to get back files that you have deleted from the Recycle bin itself. EaseUS Data Recovery Wizard free can easily recover lost files, pictures, documents, videos and more from deleting, formatting, partition loss, OS crash, virus attack and other data loss cases.
How To Recover Deleted Files?
If you are struggling to get back your lost data files, then here is an easy data recovery method which will help you to get back deleted files on your computer. Below, we are going to share a mini guide on how to use EaseUS Recycle Bin Recovery to get back your deleted data.
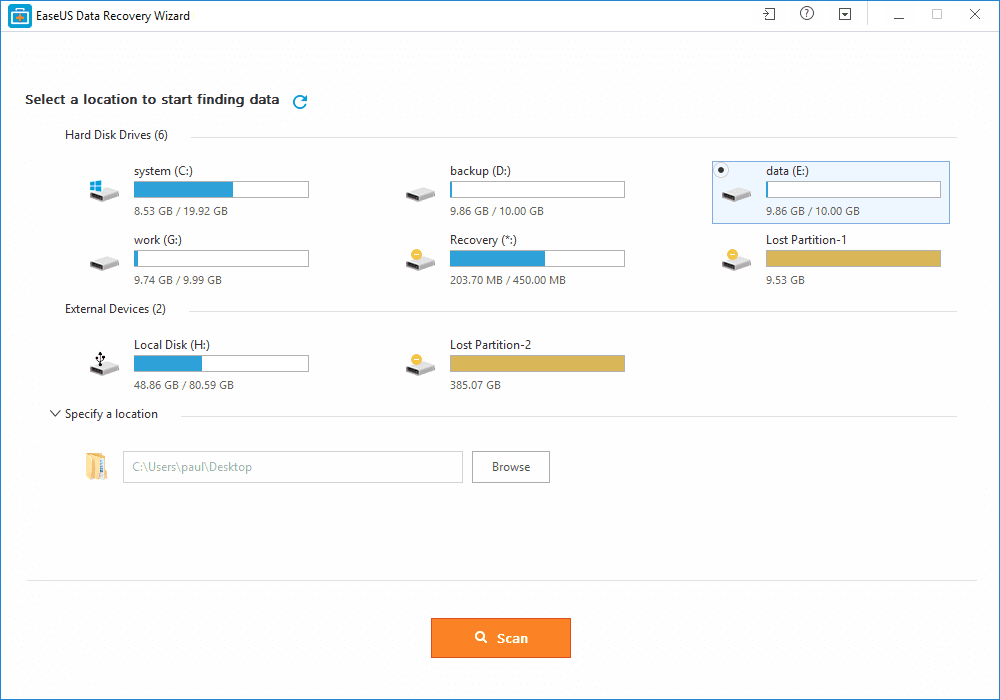
Step 1. First of all, you need to download and install EaseUS Data Recovery Wizard on your Windows computer and then launch it normally. You need to select the location where you want to scan and then click on 'Scan'
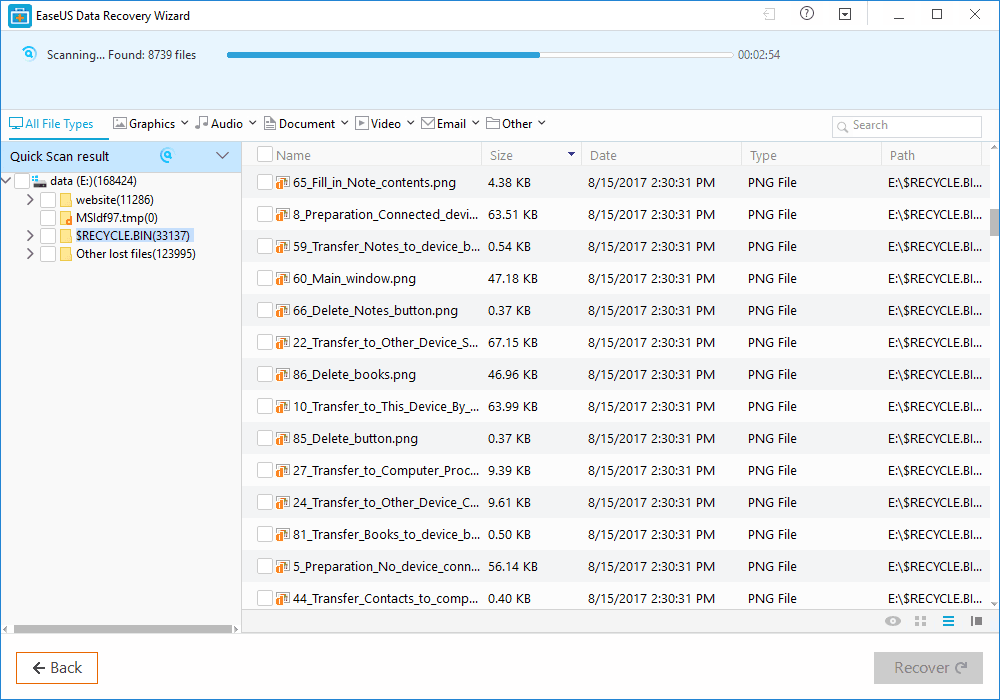
Step 2. Now, wait for few minutes until the tool finishes scanning your drive. The tool search for files that got deleted or cleaned from the Recycle Bin.
Step 3. Now it will show you files that you can recover. Here you need to click on the file which you want to recover and click on 'Recover'
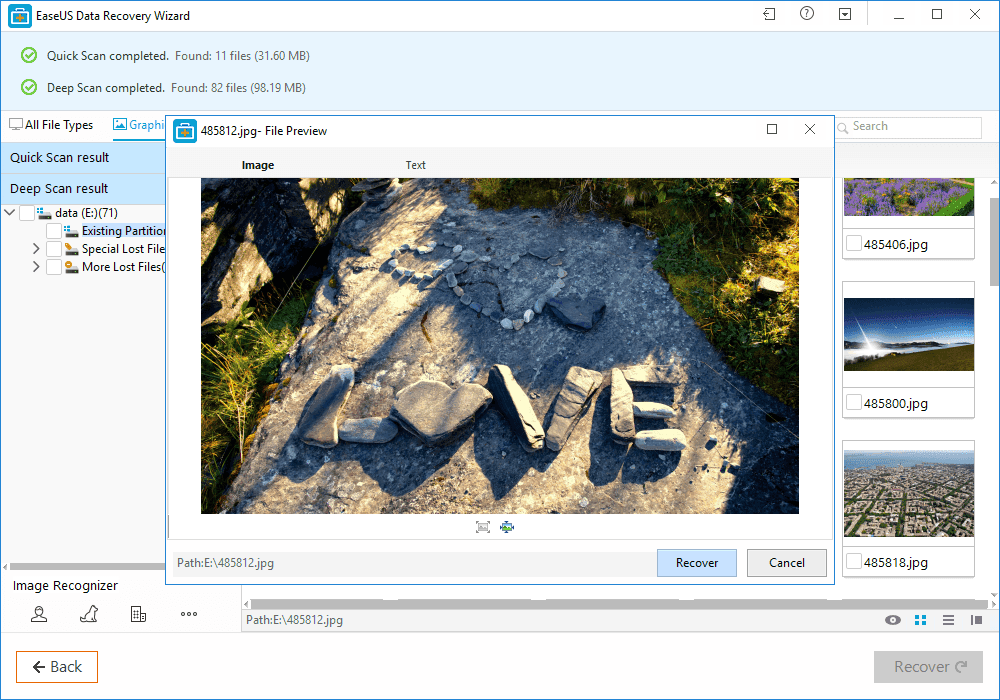
That's it, you are done! This is how you can use EaseUS data recovery to get back your deleted files on your computer.
Benefits of EaseUS Data Recovery
Well, the data recovery tool provided by EaseUS comes with many benefits. It can not only recover accidentally deleted files, but it can also recover data in case of Virus Attacks, Hard Disk Damage, OS Crash etc.
You can also use this awesome data recovery wizard to recover deleted files from External Disk, USB Drive, Camcorder, Mobile Devices, Zip Drive, iPod, Music Player and more.
Overall, this is one of the best data recovery tools you can have on your Windows computer. EaseUS Data Recovery also has a free version with restricted features. Overall, this is a stress-free solution to get back your deleted files
Continue reading
HiddenWasp Linux Malware Backdoor Samples
Here are Hidden Wasp Linux backdoor samples.
Enjoy
Reference

Intezer HiddenWasp Malware Stings Targeted Linux Systems
Download

File informatio
8914fd1cfade5059e626be90f18972ec963bbed75101c7fbf4a88a6da2bc671b
8f1c51c4963c0bad6cf04444feb411d7
shell
f321685342fa373c33eb9479176a086a1c56c90a1826a0aef3450809ffc01e5d
52137157fdf019145d7f524d1da884d7
elf
f38ab11c28e944536e00ca14954df5f4d08c1222811fef49baded5009bbbc9a2
ba02a964d08c2afe41963bf897d385e7
shell
e9e2e84ed423bfc8e82eb434cede5c9568ab44e7af410a85e5d5eb24b1e622e3
cbcda5c0dba07faced5f4641aab1e2cd
elf shared-lib
d66bbbccd19587e67632585d0ac944e34e4d5fa2b9f3bb3f900f517c7bbf518b
2b13e6f7d9fafd2eca809bba4b5ea9a6
64bits elf shared-lib
2ea291aeb0905c31716fe5e39ff111724a3c461e3029830d2bfa77c1b3656fc0
568d1ebd8b6fb17744d3c70837e801b9
shell
8e3b92e49447a67ed32b3afadbc24c51975ff22acbd0cf8090b078c0a4a7b53d
33c3f807caea64293add29719596f156
shell
609bbf4ccc2cb0fcbe0d5891eea7d97a05a0b29431c468bf3badd83fc4414578
71d78c97eb0735ec6152a6ff6725b9b2
tar-bundle gzip contains-elf
d596acc70426a16760a2b2cc78ca2cc65c5a23bb79316627c0b2e16489bf86c0
6d1cd68384de9839357a8be27894182b
tar-bundle gzip
0fe1248ecab199bee383cef69f2de77d33b269ad1664127b366a4e745b1199c8
5b134e0a1a89a6c85f13e08e82ea35c3
64bits elf
Related links
martes, 9 de junio de 2020

Linux Command Line Hackery Series: Part 2

Welcome back to Linux Command Line Hackery, yes this is Part 2 and today we are going to learn some new skills. Let's rock
Let us first recap what we did in Part 1, if you are not sure what the following commands do then you should read Part 1.
mkdir myfiles # make a directory (folder) with myfiles as name
cd myfiles # navigate to myfiles folder
touch file1 file2 file3 # create three empty files file1, file2, file3
ls -l # view contents of current directory
echo This is file1 > file1 # write a line of text to file1
cat file1 # display contents of file1
echo This is another line in file1 >> file1 # append another line of text to file1
cat file1 # display the modified content of file1
Command: cp
Syntax: cp source1 [source2 ...] destination
Function: cp stands for copy. cp is used to copy a file from source to destination. Some important flags are mentioned below
Flags: -r copy directories recursively
-f if an existing destination file cannot be opened, remove it and try again
Let us make a copy of file1 using the new cp command:
cp file1 file1.bak
what this command is going to do is simply copy file1 to another file named file1.bak. You can name the destination file anything you want.
Say, you have to copy file1 to a different folder maybe to home directory how can we do that? well we can do that like this:
cp file /home/user/
I've used the absolute path here you can use whatever you like.
[Trick: ~ has a special meaning, it stands for logged in user's directory. You could have written previous command simply asNow you want to create a new directory in myfiles directory with the name backup and store all files of myfiles directory in the backup directory. Let's try it:
cp file1 ~/
and it would have done the same thing.]
mkdir backup
cp file1 file2 file3 backup/
this command will copy file1 file2 file3 to backup directory.
We can copy multiple files using cp by specifying the directory to which files must be copied at the end.
We can also copy whole directory and all files and sub-directories in a directory using cp. In order to make a backup copy of myfiles directory and all of it's contents we will type:
cd .. # navigate to previous directory
cp -r myfiles myfiles.bak # recursively copy all contents of myfiles directory to myfiles.bak directory
This command will copy myfiles directory to myfiles.bak directory including all files and sub-directories
Command: mv
Syntax: mv source1 [source2 ...] destination
Function: mv stands for move. It is used for moving files from one place to another (cut/paste in GUI) and also for renaming the files.
If we want to rename our file1 to file1.old in our myfiles folder we'll do the follow:
cd myfiles # navigate first to myfiles folder
mv file1 file1.old
this command will rename the file1 to file1.old (it really has got so old now). Now say we want to create a new file1 file in our myfiles folder and move the file1.old file to our backup folder:
mv file1.old backup/ # move (cut/paste) the file1.old file to backup directory
touch file1 # create a new file called file1
echo New file1 here > file1 # echo some content into file1
Command: rmdir
Syntax: rmdir directory_name
Function: rmdir stands for remove directory. It is used for removing empty directories.
Let's create an empty directory in our myfiles directory called 'garbage' and then remove it using rmdir:
mkdir garbage
rmdir garbage
Good practice keep it doing. (*_*)
But wait a second, I said empty directory! does it mean I cannot delete a directory which has contents in it (files and sub-directories) with rmdir? Yes!, you cannot do that with rmdir.
So how am I gonna do that, well keep reading...
Command: rm
Syntax: rm FILE...
Function: rm stands for remove. It is used to remove files and directories. Some of it's important flags are enlisted below.
Flags: -r remove directories and their contents recursively
-f ignore nonexistent files and arguments, never prompt
Now let's say we want to delete the file file1.old in backup folder. Here is how we will do that:
rm backup/file1.old # using relative path here
Boom! the file is gone. Keep in mind one thing when using rm "IT IS DESTRUCTIVE!". No I'm not yelling at you, I'm just warning you that when you use rm to delete a file it doesn't go to Trash (or Recycle Bin). Rather it is deleted and you cannot get it back (unless you use some special tools quickly). So don't try this at home. I'm just kidding but yes try it cautiously otherwise you are going to loose something important.
Did You said that we can delete directory as well with rm? Yes!, I did. You can delete a directory and all of it's contents with rm by just typing:
rm -r directory_name
Maybe we want to delete backup directory from our myfiles directory, just do this:
rm -r backup
And it is gone now.
Remember what I said about rm, use it with cautious and use rm -r more cautiously (believe me it costs a lot). -r flag will remove not just the files in directory it will also remove any sub-directories in that directory and there respective contents as well.
That is it for this article. I've said that I'll make each article short so that It can be learned quickly and remembered for longer time. I don't wanna bore you.
Related articles
Suscribirse a:
Entradas (Atom)

